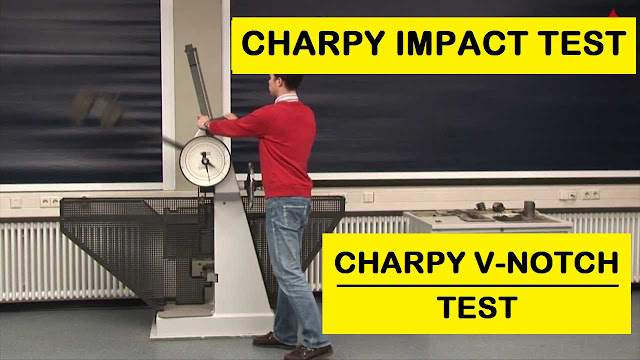
Charpy Impact Test | Charpy V-Notch Test
IMPACT ENERGY
Impact energy is a measure of the work done to fracture a test specimen. When the striker impacts the specimen, the specimen will absorb energy until it yields. At this point, the specimen will begin to undergo plastic deformation at the notch. The test specimen continues to absorb energy and work hardens at the plastic zone at the notch. When the specimen can absorb no more energy, fracture occurs.
THE CHARPY TEST
The Charpy impact test, also known as the Charpy V-notch test, is a standardized high strain-rate test which determines the amount of energy absorbed by a material during fracture. This absorbed energy is a measure of a given material's notch toughness and acts as a tool to study temperature-dependent ductile-brittle transition. It is widely applied in industry, since it is easy to prepare and conduct and results can be obtained quickly and cheaply. A disadvantage is that some results are only comparative.
The Test was developed around 1900 by S.B. Russell (1898, American) and Georges Charpy (1901, French). The test became known as the Charpy test In the early 1900s due to the technical contributions and standardization efforts by Charpy. The test was pivotal in understanding the fracture problems of ships during World War II.
Today it is utilized in many industries for testing materials, for example the construction of pressure vessels and bridges to determine how storms will affect the materials used.
OBJECT OF THE EXPERIMENT
To determine the impact strength of the material of given specimen by Charpy Impact testing.
APPARATUS USED
1. Pendulum Impact Testing Machine, serves for conducting Impact Test (CHARPY
and IZOD tests) according to IS: 1757- 1973, IS: 1499-1977 and IS: 1598-1960 respectively.
Technical Data : Maximum Impact Energy of Pendulum : 300 Joules
Minimum value of scale graduation : 2 Joules
Distance between supports : 40 mm ± 0.2 mm
TEST PIECE SPECIFICATION
According to ASTM A370, the Standard Specimen size for Charpy Impact Test is 10 mm × 10 mm × 55 mm.
Subsize specimen sizes are : 10 mm × 7.5 mm × 55 mm, 10 mm × 6.7 mm × 55 mm, 10 mm × 5 mm × 55 mm, 10 mm × 3.3 mm × 55 mm, 10 mm × 2.5 mm × 55 mm.
According to EN 10045-1 (retired and replaced with ISO 148), Standard Specimen sizes are 10 mm × 10 mm × 55 mm.
Subsize specimens are : 10 mm × 7.5 mm × 55 mm and 10 mm × 5 mm × 55 mm.
According to ISO 148, Standard Specimen sizes are 10 mm × 10 mm × 55 mm.
Subsize specimens are : 10 mm × 7.5 mm × 55 mm, 10 mm × 5 mm × 55 mm and 10 mm × 2.5 mm × 55 mm.
THEORY
At the point of impact, the striker has a known amount of kinetic energy.
The impact energy is calculated based on the height to which the striker would have risen, if no test specimen was in place, and this compared to the height to which the striker actually rises.
Tough materials absorb a lot of energy, whilst brittle materials tend to absorb very little energy prior to fracture.
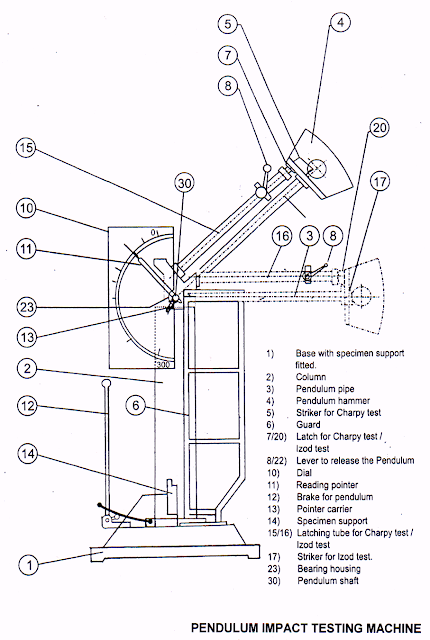
SCHEMATIC DIAGRAM OF EXPERIMENTAL SET UP
PROCEDURE OF CARRYING OUT CHARPY TEST
1. For conducting Charpy test, charpy striker (5) is to be firmly secured to the bottom of the hammer with the help of clamping piece.
2. The latching tube for charpy test is to be firmly clamped to the bearing housing on the inclined face. Before proceeding to the actual test, the test for determining the frictional loss in the machine is to be conducted.
3. Adjust reading pointer (11) with pointer carrier (13) to 300 J dial reading, when the pendulum is hanging free vertically. For this, use socket head screw of carrier.
4. Now raise the hammer (4) by hands and latch in. Release the hammer by operating lever (8). The pointer (11) will then indicate the energy loss due to friction. From this reading, confirm that the frictional loss is not exceeding 0.5% of the initial potential energy.
5. Now raise the hammer manually and latch in.
6. Place specimen on the support (14) touching end stop. The specimen should be placed in such a way that the notch is opposite to the direction of impact of the pendulum. For correct centering of the specimen, the end stop is provided.
7. Operate the lever so that the pendulum is released and specimen is hit. Wait till the pendulum is reversing its direction on motion and begins to swing slow. Thereafter, bring the pendulum carefully to stand still position by applying the pendulum brake (12).
8. Note down the impact energy.
OBESERVATION
Impact Value of the Specimen (Mild Steel) = ............................ N-m
RESULT
The energy absorbed for Mild Steel is found out to be Joules.
PRECAUTION
1. Measure the dimensions of the specimen carefully.
2. Locate the specimen of the Charpy test in such a way that the hammer,
strikes it at the middle.
3. Note down readings carefully.


No comments:
Post a Comment